- SUNY-Geneseo/Physics & Astronomy
- Spring 2017
- Twenty Fifth Annual*
- Bridge Building Contest:
- Alumni Edition
- Dr. Pogo (pogo
at geneseo.edu)
- Where's Pogo?
Date and Time: Saturday, April 29, 2017 at 1:00 pm
Newton 202
Click here to register a bridge!
Click here to vote for a time or give comments.
| List of Materials
|
Email: jake@specializedbalsa.com http://www.specializedbalsa.com/products/balsa_sticks.php http://www.specializedbalsa.com/products/balsa_sheets.php
|
Please note that by default, you get a randomly selected quality of wood. To ensure you get the highest quality, you need to enter "extra heavy" into the "Notes" box at the bottom of each ordering page (i.e., the page for "sticks", and the page for "sheets". Entering this note will incur a +100% service charge, but it's worth it! The ordering form consists of checkboxes to specify quantities. |
|||||
| Permitted Quantity | Description | Price Each | Subtotal | Notes | |||
| 20 | 1/8 x 1/8 x 36 inches long balsa sticks | $0.29 | $5.80 |
|
|||
| 15 | 3/16 x 3/16 x 36 inches long balsa sticks | $0.44 | $6.60 | ||||
| 8 | 1/4 x 1/4 x 36 inches long balsa sticks | $0.53 | $4.24 | ||||
| 1/2 | 3/32 x 2 x 36 inches long balsa sheet | $1.37 | $1.37 |
|
|||
|
Balsa Total: |
$18.01 | ||||||
|
Specify "extra heavy": |
+$18.01 | ||||||
|
Hard Balsa Total: |
$36.02 |
|
|||||
| ----------- | ---------------------------------- | ---------- | ----------- | ------------------------------------- | |||
| 20 |
|
|
|
||||
| 1 bottle | Elmer's "Glue All" |
|
|
||||
|
|
Optional Materials |
|
|||||
| any | Medium binder clips |
|
In order to bond properly, all wood glues (including Elmer's Glue-All) must be clamped while drying (see tips below). These medium binder-clips make great clamps. |
||||
| Small binder clips |
|
These smaller clips are a little less useful, but are good for clamping some of your smaller pieces together without crushing the wood. |
|||||
Design & Construction Suggestions
1. Try to use most of your wood to get the strongest bridge.
2. A lot of students draw a full-scale image of their bridge on large paper to facilitate construction.
3. For discussion purposes, imagine a bridge of more-or-less this form. Blue is the right side, green is the left, orange is the floor, and pink is for the main axial supports. Here are some common mistakes each year.
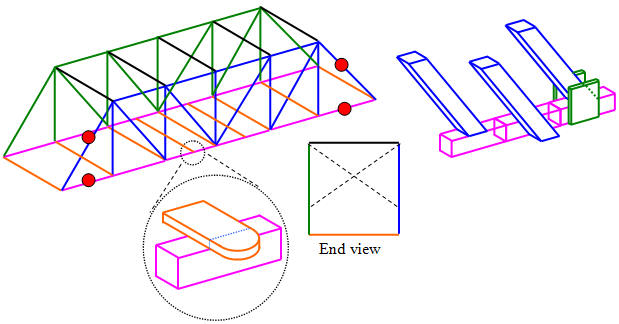
a. If you assume the bridge is a truss (perhaps by using some free software for truss analysis), you will severely under-estimate the stress in the parts indicated with red circles. You want to make these 8 pieces a lot stronger than you’d otherwise think, because while this design is "trussy", it is not strictly a truss and bending moments are significant.
b. When seen end-on (lower right image), the structure looks like a rectangle and is very susceptible to small asymmetries in loading. At a few cross sections, you need to add one or both of the diagonals indicated by the dotted line. But, they can’t reach all the way to the bottom, because you need to leave space for the testing device.
c. Speaking of which, you need to make sure that you have a way to slide the testing device into the bridge pretty quickly. Most students come from the end of the bridge, but some bring it in at an angle through the bottom.
d. Most students over-build the floor, making it almost solid with popsicle sticks (orange). I think this is overkill; no bridge has ever failed because these popsicle sticks broke. On the other hand, many bridges have failed because the popsicle sticks had insufficient overlap with the main axial members (see circular inset). During testing, the main (pink) axial members flex outwards, and sometimes the entire orange floor drops out of the bridge without any piece actually breaking.
e. Really tall and really short bridges never win. The ratio of length to height for most winners is between 2.5 and 3.5.
f. Smear a thin layer of glue on each of the two surfaces to be glued. Clamping is the key to good gluing. But, clamping requires that the glued surfaces be oriented correctly, which can be hard. Consider the 3 choices of intersection of blue and pink in the rightmost image above. The left most connection is impossible to clamp. The middle one can be clamped, but maybe your sticks are hard to position like this. The third is like the first, but with some gussets on each side. You’d still glue the blue to the pink, but now the green gussets will help carry some of the load, and they can be easily clamped while the glue dries.
g. Metal binder clips from Staples make great clamps (see optional materials, above).
h. Bridges usually warp while the glue dries, which is bad but not a disaster. However, you do really need the four bottom corners to lie in a single plane. Once all of the bridge is completely done drying, you can add some shims (made from leftover balsa) underneath one of the four corners to keep the bridge from being wobbly.