- What am I doing here? LabVIEW is a graphical programming environment and language used to create data acquisition and control interfaces. In other words, it is used to enable a computer to control other real-world hardware. As a result of completing this course, you will be able to create control and acquisition programs using LabVIEW, and you will be able to interface the LabVIEW computer to external hardware using at least three protocols. We are using LabVIEW 2022.
- Where can I get a textbook?
- The LabVIEW software comes with excellent documentation, which we will consult in place of a textbook. If you want a book of your own, you might try this one:
- LabVIEW for Scientists and Engineers, by John Essick,
- Also, you can purchase LabVIEW directly from National Instruments at www.ni.com.
- You can get a one year student license of LabVIEW for free from CIT to install on your windows laptop. Mac users will have to use a windows emulator, such as “Bootcamp”.
- How will I be graded? That depends on the track you choose. At the beginning of the semester, you are in the “Homework” Track. You may request to change to the “Project” Track by sending me an email on or prior to October 17, 2023. Staying with the Homework Track ensures that you are exposed to as many hardware types as possible. Choosing the Project Track means that you will have a chance to express some creativity, and to learn about the struggles associated with project conception and its expression, redesign, and implementation. Once you choose the Project Track, you cannot pass the class unless you earn at least a “D” grade for project stages 6 and 7. Late assignments lose up to 1.5 points per day. Since assignments are typically worth 25 to 65 points, it's often better to submit a slightly late assignment that works instead of submitting a non-functional assignment on time.
-
-
Graded Activity
Homework Track Project Track Weekly Assignments 1 through 7
- 50% Weekly Assignments 1 through 10 80% - Quizzes 1 through 5 20% 15% Project Stages 1 through 5 0% 15% Project Stages 6 and 7 0% 20%
- How will I submit assignments? You must drag/copy the code for your weekly assignments into my inbox: \\files\Inbox\Physics\Pogo. You can get there from the RUN… menu on your PC if you have VPN installed (CIT has a help page). Assignments must be titled ##-LastnameFirstInitial.vi. So, my third assignment would be called “03-PogoE.vi”. Sometimes, you will have to include extra files, too. If you have multiple files, use the same naming rules to create a personal folder. You may never submit .zip files.
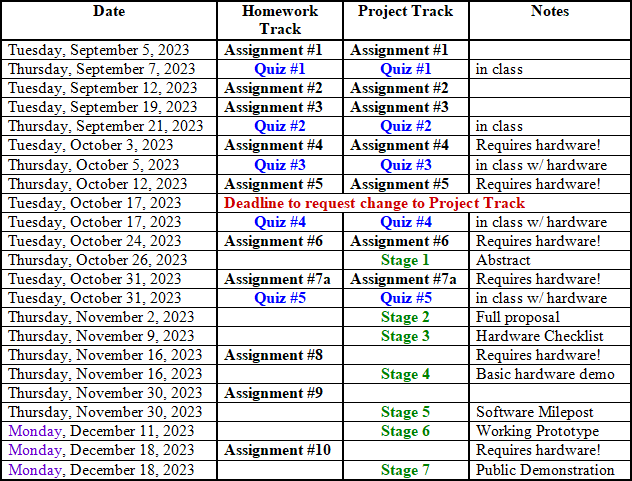
What are these “stages” for the project? Projects will be completed and submitted in stages.
Stage 1: An abstract for your project. It is your responsibility to find an idea, not mine! You must use this submission form.
Stage 2: A complete written proposal. The project proposal must be a short professional report describing the scope of your project. It must include (a) a new abstract, incorporating any revisions; (b) a detailed hardware list including DAQs, resistors, tape, screws, wood blocks, wires, etc.; (c) sketches of all the custom hardware you will build (or 3D print); (d) an example screenshot showing the GUI; (e) a discussion of other user interfacing (i.e., does the user need to adjust a voltage?); (f) a description of the measurement(s) to be made, including frequency, magnitudes, and units; (g) a description of what data will be permanently saved during each trial; (h) a description of what you want to be graded in stage 5 (allowing you to create a significant deadline for yourself), (i) a detailed flowchart diagramming the flow of information in the system, explicitly showing the necessary feedback with arrows between your blocks.
Stage 3: A detailed checklist (see also stage 2b) verifying that all the equipment has been obtained.
Stage 4: An in-class demonstration that each individual element of external hardware can, at a minimum, send or receive data from the computer, as appropriate.
Stage 5: A demonstration of your software so far, as defined by you in stage 2h.
Stage 6: A complete working prototype. Everything must work, but there may still be small glitches.
Stage 7: A public demonstration of your working project (“The LabVIEW Fair”).- Learning Outcomes
- At the end of this course, students will:
- · Be able to design, create, and debug instrument control and acquisition programs using LabVIEW
- · Be able to use LabVIEW to interface your computer to instruments using at least three protocols (analog DAQ, digital DAQ, and RS-232 serial). In addition, you may learn other protocols (e.g., GPIB, USB).
- · Design, create, and debug complex systems of instruments combining data input and output to work with your computer.
- · Have an opportunity to install and activate software drivers for hardware components.
Also, the college provides information at the following URL relating to a variety of topics:
https://wiki.geneseo.edu/display/PROVOST/Syllabus+Resources+Related+to+Student+Success